
Main Courses
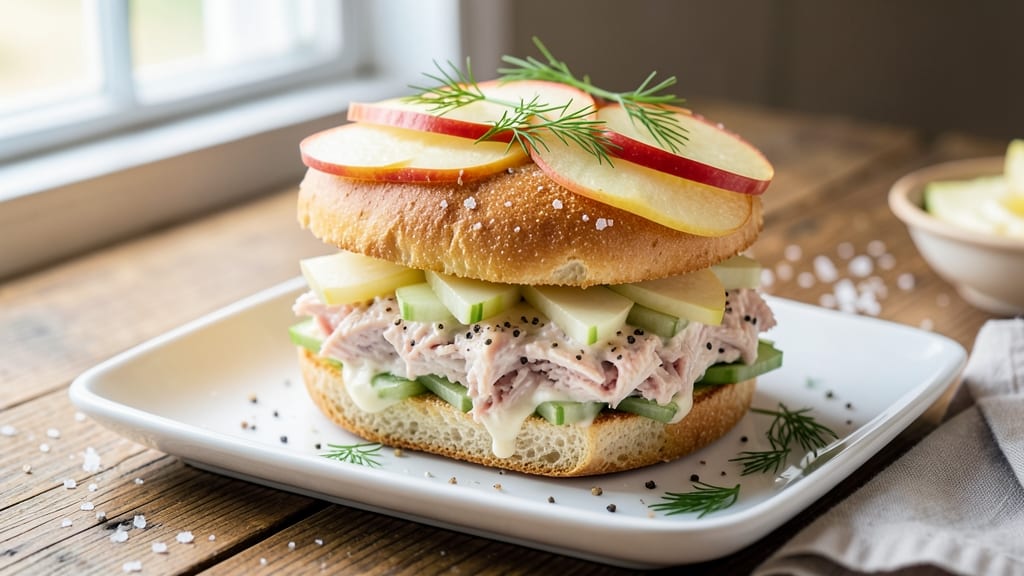
This apple tuna sandwich recipe transforms a classic lunch into something unexpectedly sophisticated—where crisp celery, sweet apples, and creamy tuna create a perfect bite. The key is balancing textures: crunchy apple slices, tender celery, and flaky tuna all layered between slices of sturdy bread.
I developed this version after realizing how much better a simple tuna sandwich tastes when elevated with fresh fruit and a touch of tangy mayo.
The magic happens in the layering: start with a thin spread of mayo mixed with lemon juice for brightness, then add the tuna, celery, and apple in even slices. A sprinkle of fresh dill or parsley ties everything together, while a final press ensures each bite holds its shape.
This sandwich works with any bread—whole grain for heartiness, sourdough for depth, or gluten-free for flexibility—but the flavor balance remains the same.
What you’ll end up with is a sandwich that’s creamy from the tuna, crisp from the apple, and fresh from the celery, all held together by a light, tangy mayo.
It’s the kind of lunch that feels special without being fussy, and it keeps well for up to two days in the fridge. The combination of sweet, salty, and creamy flavors makes it a standout even among sandwich lovers.
For extra crunch, add a handful of walnuts or pecans to the mix, or swap the apple for pear if you prefer a milder sweetness. Pair it with a side of carrot sticks or a simple green salad to round out the meal.
Let’s build this sandwich step by step—it’s easier than you think!
Ingredients for apple tuna sandwich
Sweet apples, creamy tuna, and crisp celery come together for a lunch that feels special.
| Ingredient | Amount | Notes |
|---|---|---|
| Canned Tuna in Water 🐟 | 12 oz | Drained well, flaked with fork |
| Mayonnaise 🥫 | ½ cup | Light or regular preferred |
| Lemon Juice 🍋 | 1 tbsp | Freshly squeezed, for brightness |
| Celery Stalk 🧅 | 2 whole | Thinly sliced, crisp variety |
| Apples 🍎 | 1 medium | Sweet variety, thinly sliced |
| Fresh Dill 🌿 | 2 tbsp | Chopped, or substitute parsley |
| Bread 🍞 | 8 slices | Sturdy variety like sourdough |
| Salt 🧂 | ½ tsp | Kosher or sea salt preferred |
| Black Pepper 🌶️ | ¼ tsp | Freshly ground for best flavor |
| Walnuts 🌰 | ¼ cup | Optional, chopped for crunch |
| Olive Oil 🫒 | 1 tsp | For light brushing on bread |
The apples are non-negotiable—Honeycrisp or Fuji stay crispest after slicing. Grab them at Trader Joe's if you want to skip the core, or just peel and slice at home. Celery? Bright green stalks are fresher—avoid the wilted ones. For the tuna, Wild Planet or Starkist brands are my go-tos, but any water-packed works. The mayo should be light but creamy—Hellmann's or Duke's are reliable. Fresh dill is ideal, but dried works at half the amount if you're in a pinch.
No fresh dill? Substitute parsley or even a pinch of dried dill—just taste as you go. Swapping apples for pears? Bosc pears hold up best to slicing. Want extra crunch? Walnuts or pecans add texture without overpowering. The walnuts in this list are optional but worth it—they keep for weeks in the freezer if you buy in bulk. For the bread, sourdough or whole grain gives the best bite, but any sturdy loaf works. Gluten-free? Look for a sturdy GF bread like Canyon Bakehouse.
Prep the apples and celery first—they oxidize fast. Store them in cold water until ready to assemble. The tuna mix keeps for 2 days in the fridge, but the sandwiches themselves are best eaten fresh. For extra flavor, brush the bread with olive oil before assembling. These sandwiches reheat poorly, so make them fresh or pack with a cold pack. Leftovers? Wrap tightly and store for 1 day—the bread gets soggy after that.
Why You'll Love This Recipe
- No-Chop Nightmare: I swear by this recipe because the only prep is dicing apples and celery—maybe 5 minutes max. The tuna’s already drained, the mayo’s right there, and the lemon juice takes seconds to squeeze. Honestly, it’s the kind of sandwich I make when I’m too tired to think.
- Sweet-Savory Magic: That crisp apple bite cuts through the creamy tuna like a fresh breath of air—bright, tangy, and just enough crunch. The lemon juice ties it all together, so it’s never dry or fishy. Between us, it’s the only tuna sandwich my kids won’t trade for peanut butter.
- Lunchbox Legend: Pack these for school, work, or a picnic—no reheating required. The apples stay crisp, the celery holds its shape, and the mayo keeps everything cohesive. I’ve sent these in bento boxes, wrapped in foil, even frozen for later. They’re my go-to when I need a lunch that doesn’t involve sad desk salads.
- Pantry Powerhouse: Three ingredients cost me less than $5, and it feeds four. The leftovers? Just as good the next day—if they last that long. I’ll be real: this is my budget-friendly, no-fuss answer to “what’s for dinner” when I’m broke or busy. Zero guilt, all flavor.
Step-by-step instructions for apple tuna sandwiches
Here's how to assemble these creamy, crunchy apple tuna sandwiches with perfect texture every time.
Prepare the Tuna Mixture
Drain the 12 oz canned tuna in water thoroughly and flake it with a fork into a medium bowl. You want small, even pieces that will blend smoothly with the other ingredients. If there are any large chunks, break them down gently with your fingers.
Add the 0.5 cup mayonnaise, 1 tbsp lemon juice, 0.5 tsp salt, and 0.25 tsp black pepper to the tuna. Mix everything together with a wooden spoon until fully combined. The lemon juice will brighten the flavors and cut through the richness of the mayonnaise, creating that perfect tangy balance we're after.
Add Crunchy and Fresh Ingredients
Thinly slice the 2 whole celery stalks and 1 medium apple into matchsticks. I like to use a sharp knife and cut them as evenly as possible for consistent texture in every bite. Add these to the tuna mixture along with the 2 tbsp chopped fresh dill and 0.25 cup chopped walnuts (if using).
Gently fold everything together with your spoon. You want to keep the celery and apple pieces intact for that satisfying crunch, but distribute them evenly throughout the mixture. If you're using walnuts, their nutty flavor will complement the sweetness of the apples beautifully.
Toast the Bread for Structure
Lightly brush 1 tsp olive oil on one side of each 8 slices bread. I like to use a sturdy variety like sourdough that can hold up to the filling without getting soggy. Toast the bread in a toaster or toaster oven until it's just golden and slightly crispy.
This toasting step is crucial—it prevents the bread from becoming mushy when we add the wet tuna mixture. Toasting also adds a nice texture contrast to the sandwich. Let the toasted bread cool for a minute before assembling so it's warm but not hot when you put it together.
Assemble the Sandwiches
Spread an even layer of the tuna mixture onto the unbuttered side of each toasted bread slice. I like to use about 2 tablespoons of filling per slice—enough to be generous but not so much that it spills out when you bite in. The filling should be about ¼-inch thick for the perfect balance.
Press the two slices together gently to form a sandwich. You'll end up with 4 sandwiches total. For an extra touch, you can lightly toast the assembled sandwiches in a pan for 1-2 minutes per side until they're golden brown and crispy on the outside. This step is optional but adds a nice final texture contrast.
Pro Tips For Making Apple Tuna Sandwich
- Drain and press the tuna: Skip the soggy mess—drain the canned tuna in a fine-mesh strainer, then press it gently with a spoon or your fingers to squeeze out every last bit of water. This keeps your filling from turning into a sad, watery sludge, especially if you’re using whole-wheat bread that soaks up moisture like a sponge.
- Slice apples last minute: Apples brown fast, and nobody wants a filling that looks like it’s been sitting since yesterday. Hold off on dicing them until you’re ready to assemble the sandwich—toss the slices in a splash of lemon juice if you need to prep ahead, but even then, wait 10 minutes before mixing.
- Chop celery fine and small: I used to leave celery in big chunks, thinking it was "healthier." Wrong. Tiny dice (1/8-inch or smaller) distribute flavor evenly and prevent that weird texture contrast where you get a mouthful of crunch followed by a bland bite. A sharp knife and a steady hand make this easier—no need to force it.
- Balance the mayo: Too much mayo makes this sandwich greasy; too little makes it dry. Start with 2 tablespoons per can of tuna, then adjust based on your bread’s thickness. If you’re using whole-grain or sourdough, which absorb moisture faster, lean toward the higher end—but don’t drown it. Taste the filling before assembling.
Common mistakes when making your apple tuna sandwich
Over-Soggy Bread
Skipping the toast step is the fastest way to ruin your sandwich. Wet tuna mixture will turn sturdy bread soggy in minutes. I’ve learned the hard way—always toast your bread until golden, even if you’re in a rush.
For extra insurance, brush the toasted side with 1 tsp olive oil before assembling. This creates a barrier that keeps the filling crisp. 🌟
Uneven Filling
Piling too much filling on one slice creates an unbalanced bite. Aim for 2 tablespoons per slice—about ¼-inch thick. Use a spoon to spread evenly, then press gently to distribute weight.
I’ve seen people load one side heavily, making the sandwich lopsided. A level spread ensures every bite has the perfect mix of textures.
Skipping the Lemon
The 1 tbsp lemon juice is non-negotiable—it cuts through the mayo’s richness and brightens the tuna. Without it, the flavors get flat and heavy. I’ve tried this sandwich without lemon, and it’s noticeably duller. Fresh lemon works best, but bottled will do in a pinch. Don’t skip this step!
Using Wilted Celery
Celery that’s lost its crispness turns mushy in the sandwich. Always pick bright green stalks with firm texture. If yours looks wilted, soak in ice water for 10 minutes before slicing. I’ve ruined sandwiches with limp celery—trust me, it’s a game-changer to use fresh. 🧅
Not Pressing Firmly
Gently pressing the sandwich together after assembly keeps everything in place. A loose assembly leads to filling spilling out or separating. Press for 5-10 seconds—just enough to hold the layers. This simple step makes the difference between a neat sandwich and a messy one.
Storing Improperly
Wrapping sandwiches directly in plastic traps moisture, making bread soggy. Instead, wrap each sandwich in parchment paper first, then in foil. Store in an airtight container for up to 1 day.
I’ve seen people store them unwrapped, and the results are always disappointing. Keep them cold and dry for the best texture later.
Nutrition facts
Frequently asked questions
Can I use oil-packed tuna instead of water-packed?
Yes, but you'll need to drain it thoroughly and reduce the mayo slightly. Oil-packed tuna has a richer flavor, so start with 0.3 cup mayo instead of 0.5 cup to balance the oiliness. The lemon juice will still help cut through the richness.
What's the best apple variety for this sandwich?
Honeycrisp or Fuji apples stay crispest after slicing and hold their shape well. Avoid soft varieties like Gala—they'll turn mushy in the sandwich. For extra crunch, slice them just before assembling and store them in cold water until ready to use.
How do I make this gluten-free?
Use a sturdy gluten-free bread like Canyon Bakehouse or Schär and check all ingredients for hidden gluten. The filling stays the same, but gluten-free bread toasts faster—watch it closely to avoid burning. The texture will be slightly denser but still delicious.
Can I make these ahead of time?
Assemble the sandwiches up to 2 hours ahead and wrap tightly in parchment paper, then foil. Store in an airtight container in the fridge. For best texture, eat within 6 hours—the bread stays crisp longer if you skip the final toast until serving.
What if I don't like celery?
Swap it for shredded carrots or thinly sliced red bell pepper for crunch. If you prefer no crunchy veggies, just increase the apple to 1.5 cups sliced and add 1 tbsp chopped red onion for a mild bite. The texture contrast is key!