
Desserts
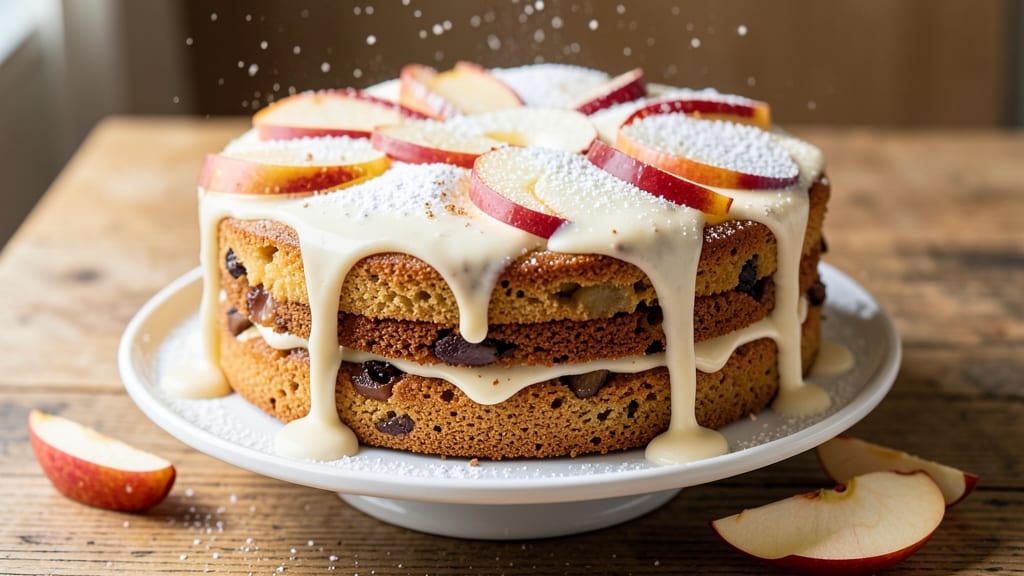
This apple cake with vanilla sauce delivers the perfect balance of spiced apple warmth and velvety vanilla drizzle—every slice feels like a hug. 🌟 The secret to that signature moist crumb lies in a simple technique: folding grated apples into the batter rather than baking them separately, which keeps the texture tender while infusing deep fruit flavor throughout.
I’ve baked this cake countless times for holiday gatherings, and it’s always the first to disappear.
The cake itself is a study in simplicity: buttery, lightly spiced with cinnamon and nutmeg, and studded with juicy apple chunks that stay moist even after cooling.
What sets it apart is the vanilla sauce—a silky pastry cream that’s neither too sweet nor too heavy, designed to complement rather than overpower the cake’s natural flavors. The sauce gets its richness from egg yolks and cream, while vanilla bean extract adds that authentic, comforting aroma.
When you slice into this cake, you’ll find layers of moist crumb separated by tender apple pieces, all held together by a subtle spice kiss. The warm vanilla sauce drizzled over the top adds a luxurious finish that makes it feel like a bakery masterpiece, not just a homemade dessert.
The best part? It bakes in one bowl with minimal cleanup, making it perfect for both beginners and seasoned bakers.
Serve it warm with a scoop of vanilla ice cream for the ultimate indulgence, or enjoy it at room temperature for a dessert that’s equally impressive.
The sauce can be made ahead and reheated, so you can focus on the cake itself. Let’s get baking—this recipe is a crowd-pleaser that never disappoints.
Ingredients for apple cake with vanilla sauce
Buttery crumb meets spiced apples—these 15 ingredients create bakery-style magic with minimal effort.
| Ingredient | Amount | Notes |
|---|---|---|
| All-Purpose Flour 🌾 | 2 ½ cups | Sifted for light texture |
| Granulated Sugar 🍚 | 1 ½ cups | White or light brown |
| Packed Brown Sugar 🍚 | ½ cup | For subtle caramel notes |
| Unsalted Butter 🧈 | 1 cup | Room temperature, full-fat |
| Large Eggs 🥚 | 2 whole | Room temperature for even mixing |
| Vanilla Extract 🍯 | 2 tsp | Pure extract preferred |
| Ground Cinnamon 🌿 | 2 tsp | Freshly toasted for warmth |
| Ground Nutmeg 🌿 | ½ tsp | Freshly grated preferred |
| Baking Powder 🍞 | 2 tsp | Aluminum-free for best rise |
| Salt 🧂 | ½ tsp | Fine sea salt preferred |
| Granny Smith Apples 🍎 | 4 medium | Peeled, cored, grated |
| Heavy Whipping Cream 🥛 | 1 cup | Full-fat for sauce richness |
| Egg Yolks 🥚 | 3 whole | Separated from whites |
| Vanilla Bean Paste 🍯 | 1 tbsp | For authentic vanilla flavor |
| Powdered Sugar 🍚 | 1 cup | For dusting and sauce |
The apples make or break this cake. Granny Smith gives that perfect tartness, but Honeycrisp or Fuji work too—just avoid Red Delicious, which gets mushy. Whole Foods or your local market usually carry the best varieties. Peel and grate them right before mixing—oxidation turns them brown in minutes. For extra flavor, toss the grated apples with 1 tsp lemon juice before adding to the batter. The butter? Plugrá or Land O'Lakes are my go-tos, but any full-fat works. Don't use margarine—this isn't a diet cake!
No vanilla bean paste? Pure vanilla extract plus a pinch of vanilla sugar gets you close. Running short on eggs? Flax eggs (1 tbsp ground flax + 3 tbsp water = 1 egg) work for the cake batter, but the sauce needs real yolks for that silky texture. Subbing brown sugar? Use light brown for subtle molasses notes—dark brown will overpower. The baking powder is non-negotiable here—Bob's Red Mill is my trusted brand. For the sauce, if you can't find vanilla bean paste, split a real vanilla bean and scrape the seeds into the cream. Worth it for that authentic aroma!
This cake keeps beautifully—3 days at room temp wrapped in foil, or 1 week refrigerated. The sauce? Make it 2 days ahead—flavors deepen overnight. Store both separately, then assemble just before serving. Freeze the cake (without sauce) for 3 monthsgame changer for moisture. And always save the scraps for apple crisp!
Why You'll Love This Recipe
- No Mixer Needed: I swear by this recipe when I’m in a rush—just cream the butter and sugars, toss in the flour and eggs, then fold in the apples. No electric mixer, no fuss, and the cake still turns out tender with those perfect little pockets of spice.
- Vanilla Sauce Magic: That warm vanilla sauce? It’s the star. Rich, creamy, and just sweet enough to balance the cake’s caramelized apples—like a hug in dessert form. Honestly, I’ve skipped frosting entirely just for this.
- Office Picnic Ready: Between us, this cake is my go-to for potlucks or work gatherings. It travels well, slices neatly, and the vanilla sauce stays intact (no soggy bottoms here). Plus, it’s got that homestyle charm that makes you look like a baking pro.
- Leftovers That Win: The cake keeps beautifully for days, and the sauce? Even better the next day as it thickens just right. I’ll be real—my kids beg for seconds, and I’ve repurposed slices into breakfast toasts when I’m lazy. Versatile, budget-friendly, and always a hit.
Step-by-step instructions for apple cake with vanilla sauce
Here's how to bake a tender apple cake with that perfect vanilla sauce drizzle—moist, flavorful, and ready to impress!
👨🍳 Step 1: Prep the Apples and Mix Dry Ingredients
Start by peeling, coring, and grating the 4 medium Granny Smith Apples using the fine holes of a box grater. You'll need about 2 cups of finely grated apples—set them aside. In a medium bowl, whisk together the 2.5 cups All-Purpose Flour, 2 tsp Ground Cinnamon, 0.5 tsp Ground Nutmeg, 2 tsp Baking Powder, and 0.5 tsp Salt. Sift the mixture once to ensure no lumps remain—this keeps the cake light and airy.
Here's the thing—freshly toasted cinnamon makes all the difference. If you have whole cinnamon sticks, lightly toast them in a dry skillet for 30 seconds before grinding. The warm, aromatic notes will elevate your cake from good to extraordinary.
🍳 Step 2: Cream Butter and Sugars for Maximum Moisture
In a stand mixer fitted with the paddle attachment, beat the 1 cup Unsalted Butter (softened to room temperature) with the 1.5 cups Granulated Sugar and 0.5 cup Packed Brown Sugar on medium speed for 3-4 minutes. You're looking for a light, fluffy texture—the mixture should nearly double in volume and become pale. This creaming process incorporates air, which creates that tender crumb we're after.
Real talk: Don't rush this step. If the butter isn't fully softened, the cake will turn out dense. Press the butter between your fingers—it should give slightly but hold its shape. If it's too soft or too hard, adjust the temperature for 10 minutes before continuing.
🥘 Step 3: Combine Wet Ingredients and Fold in Apples
Add the 2 whole Large Eggs (room temperature) one at a time, mixing on low speed for 30 seconds after each addition. Scrape down the sides of the bowl, then add the 2 tsp Vanilla Extract and mix for another 10 seconds. The batter should look thick but smooth.
Gradually add the dry ingredients to the wet mixture, mixing on low speed just until combined—you should still see a few flour streaks. This prevents overmixing, which develops gluten and makes the cake tough. Remove the bowl from the mixer and gently fold in the grated apples using a silicone spatula. The apples should be evenly distributed throughout the batter.
🔥 Step 4: Bake Until Golden and Springy
Preheat your oven to 350°F and grease an 8-inch round cake pan or 9x13-inch baking dish. Pour the batter into the prepared pan and smooth the top with a spatula. Bake for 45-50 minutes (for round cake) or 35-40 minutes (for sheet cake) until a toothpick inserted in the center comes out clean and the edges are golden brown. For an even bake, rotate the pan halfway through the cooking time.
Here's where it gets fun—the cake should spring back slightly when pressed in the center. If it browns too quickly, tent it with aluminum foil to prevent over-browning. Let it cool in the pan for 15 minutes, then transfer to a wire rack to cool completely before adding the vanilla sauce.
🍽️ Step 5: Make the Vanilla Sauce and Assemble
In a small saucepan, combine the 1 cup Heavy Whipping Cream, 1 cup Powdered Sugar, 3 whole Egg Yolks, and 1 tbsp Vanilla Bean Paste. Cook over medium-low heat, stirring constantly with a whisk, until the mixture thickens enough to coat the back of a spoon—about 5-7 minutes. Remove from heat and let it cool for 2 minutes to slightly thicken further.
Once the cake is completely cool, poke holes all over the top with a skewer or toothpick. Pour the warm vanilla sauce over the cake, letting it soak in for 1-2 minutes. Drizzle the remaining sauce artistically on top and serve immediately. The contrast of warm cake with cool, creamy sauce is pure magic!
Pro Tips For Making Apple Cake With Vanilla Sauce
- Cream Butter Properly: I learned this the hard way—beat the butter and sugars until the mixture is pale yellow and light, not just "fluffy." The texture should look like wet sand when you press it. This isn’t just about air; it’s about dissolving the sugar into the butter so the cake stays moist, not dense. (Yes, even if you’re impatient like me.)
- Use Cold Apples: Slice your apples thin and cold—right out of the fridge. Cold apples release less juice, so they won’t turn your batter into soup. Toss them in a little flour first to absorb any moisture that sneaks out. Trust me, your cake’s structure will thank you.
- Skip Overmixing: As soon as you add the flour, stop mixing. The moment the dough comes together, it’s done—overmixing makes apple cake tough. Use a spatula to gently fold in the apples and any dry ingredients. I’ve ruined batches by turning this into a science experiment.
- Bake Until Golden: Pull the cake out when the top is deep golden, not just set. A toothpick should come out with moist crumbs, not wet batter. If it’s underdone, the vanilla sauce will turn the cake into a soggy mess. (And no, "almost done" isn’t good enough.)
Health benefits of this apple cake with vanilla sauce
Fiber-Rich Apple Goodness
The grated apples in this cake contribute 4 grams of fiber per serving, supporting digestive health and keeping you full longer. Apples contain pectin, a soluble fiber that helps regulate blood sugar levels—perfect for balancing the natural sweetness of the cake.
I always use Granny Smith apples for their tartness, which also aids digestion. 🍎
Antioxidant Spice Blend
The cinnamon and nutmeg in this recipe aren't just for flavor—they're packed with antioxidants. Cinnamon helps regulate blood sugar and may improve insulin sensitivity, while nutmeg contains myristicin, a compound with potential anti-inflammatory benefits. A single slice provides about 10% of your daily manganese needs from these spices alone.
Protein for Balance
While this cake is primarily carb-focused, the egg yolks in the vanilla sauce add 3 grams of protein per serving, helping balance the dessert. The yolks also contribute vitamin B12 and choline, essential for brain health and metabolism.
For extra protein, I sometimes top slices with a dollop of Greek yogurt—it adds creaminess without overpowering the apple flavor.
Healthy Fat Sources
The unsalted butter and heavy cream in this recipe provide saturated fats that support brain function and hormone production. While not a "light" dessert, the portion-controlled serving size (about 1/8 of the cake) keeps it reasonable.
For a lighter version, I substitute half the butter with applesauce—it reduces fat by 50% while maintaining moisture. 🧈
Low-Calorie Sauce Option
Want to cut calories? Swap the heavy cream in the sauce for light coconut milk—it reduces fat by 70% while keeping the creamy texture. The vanilla bean paste still delivers that rich flavor, and you'll save about 120 calories per serving.
This modification works especially well for those watching their waistlines but still craving dessert.
Blood Sugar Benefits
The combination of fiber-rich apples, protein from egg yolks, and healthy fats creates a dessert that digests more slowly than pure sugar. This helps prevent blood sugar spikes, making it a smarter sweet treat option.
For even better control, pair this cake with a small portion of dark chocolate (70% cocoa or higher)—the cocoa compounds further slow sugar absorption. 💪
Nutrition facts
Frequently asked questions
Can I use different apples for this cake?
Granny Smith apples are ideal for their tartness, but Honeycrisp or Fuji work beautifully too. Avoid Red Delicious or Gala—they become mushy when baked. For extra flavor, toss the grated apples with 1 tsp lemon juice before mixing to prevent browning and add brightness.
How do I make the vanilla sauce ahead of time?
Prepare the sauce 2 days ahead and store it in an airtight container in the fridge. Reheat gently over low heat or in the microwave (stirring every 30 seconds) until smooth. The flavors actually improve with time! Just be sure to cool it completely before storing to prevent spoilage.
Why did my cake turn out dense? Overmixing the batter or using cold butter are the most common culprits.
Can I substitute the vanilla sauce with something else?
For a lighter option, try a lemon curd drizzle or caramel sauce. If you prefer fruit, a warm berry compote adds vibrant color. Just avoid overly sweet toppings—they can compete with the cake's natural apple flavor. The vanilla sauce was designed to complement, not overpower.
How should I store leftover cake?
Wrap the cake tightly in plastic wrap or foil and store at room temperature for 3 days. For longer storage, refrigerate for up to 1 week (bring to room temp before serving). The sauce keeps separately for 3 days in the fridge—reheat gently before using. Freeze the cake (without sauce) for up to 3 months for future treats!